Pages

Tuesday, April 28, 2020

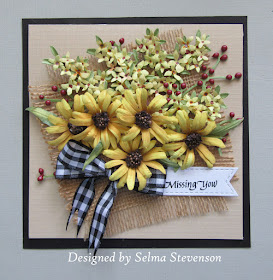
Black-eyed Susan's and Forsythia


There are many people a lot of us are missing during this time we all need to be staying home.  I decided to create a sunny card for someone special.

The background is textured tan card stock.  A piece of gunny sack material was cut in a square and threads pulled out to form a fringe.  This was attached to the card front using double sided tape.

Five of Susan's Garden Notes Black-eyed Susans were created.  The pieces in this die set were die cut using 90# cardstock, colored by sponging on two shades of yellow ink, and shaped.  The center of the flower was created by gluing the small die cut brown pieces in the center of each flower, stacking high to create a dome.  Brown prills were glued in the center of each dome.

Forsythia stems were created by die cutting Susan's Leafy Berry Branch and attaching a lot of the small yellow Forsythia flowers.  The Garden Notes Berry Branch was die cut and red berries, created with Nuvo Crystal Drops, added.  This branch was cut apart and attached behind the flowers.

A sentiment and a black/white gingham bow were added to complete the card.

Monday, April 27, 2020

River Daisy Tutorial


This morning I saw a picture of a flower I have never seen before.  I sent the picture to Susan and asked her what it was.  She immediately wrote back and told me it is a Water Daisy.  I LOVE this flower.  I decided I wanted the challenge of trying to create one using Susan's Garden Notes die sets.  


This is the picture of the flower I wanted to duplicate.


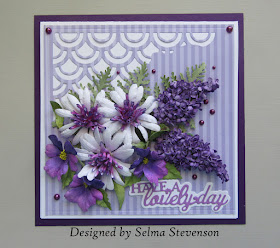
This is a close up of the flower I made.  (Now that it is all done, I should not have had the white petals bent down so much.  Oh well, the next time I will do it right!

Here is a tutorial on how I created this flower.


The Garden Notes die sets I used are the Shasta Daisy and the Calendula die sets. All the flower petals were die cut using white card stock.  Two of the largest Shasta  Daisy petals were die cut.  Two each of the medium and small Calendula flowers were die cut.  The large Shasta Daisy petals were left all white.  All the Calendula flower petals were sponged, lightly, with Altenew Magenta ink.  Ink was sponged on the backside just at the base of the petals, leaving the top of the petals white.  


On the top of the petals, Altenew Deep Iris ink was sponged at the base of the petals.  You can see this in the petals in the group on the left.  All the petals were sponged with this ink.


Lightly mist all the petals.  I have them laying on a towel.  Use Susan's self-closing tweezers and place the tip of the tweezer on the end of the petal  Roll the petal around the tweezers.  Do this to all the petals on all the flowers except the large white petals.


Cup all the small purple petals by pushing own in the molding mat with a medium ball stylus.    The large white petals need to be shaped.  The petals are probably still damp, so let them dry completely so they will hold their shape.


Pinch each of the purple flowers into a tight 'cup' and sponge dark purple on just the tips of the petals.  I used Wild Lilac ink.  Separate the large purple petals from the small petals.  Open up the petals and glue two large petals together, alternating the petals.  Glue two of the smaller petals together then glue the smaller petals inside the larger petals.  Press down well, in the center on the molding mat to cup the four petals together.   Glue two of the Shasta Daisy petals together, off setting the petals.  Glue the purple petals in the center.

To complete this arrangement, I also created a Garden Notes Lilac and a few Pansies.  In the back are a few Garden Notes Ladder Ferns.  The background design was die cut using a die from the Tonic Craft Kit #21.   The sentiment is also from that Craft Kit.  

I had a lot of fun creating this card.  I hope you are inspired to create a River Daisy (the formal name is Osteospermum ecklonis.)

Daisies and Blue Poppies


Today I created daisies and blue poppies using Susan's Garden Notes Shasta Daisy and Poppy die sets.  Also added are Forget-me-nots.


Image
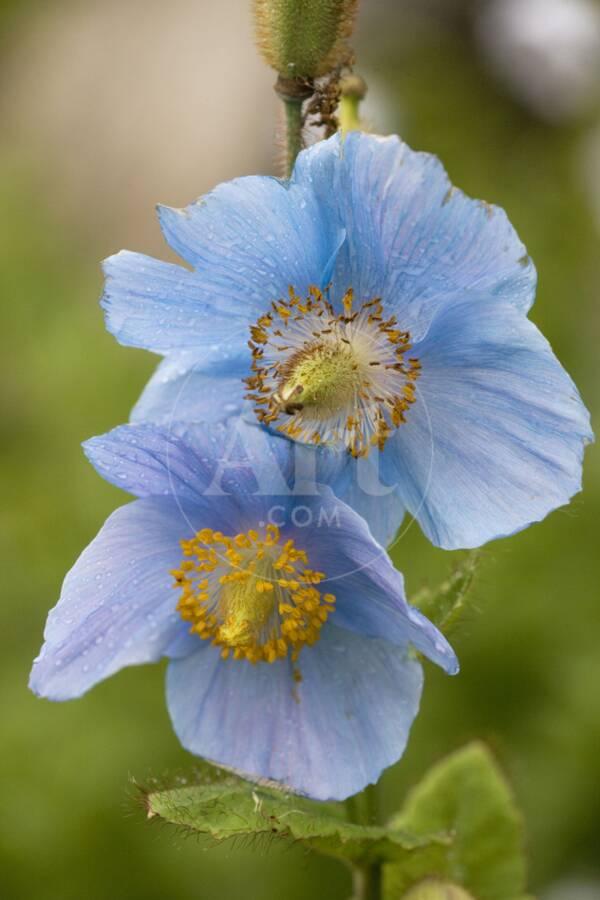
This is the inspiration picture I used to create the poppies.

The petals for the poppies were die cut using white card stock.  Light blue ink was sponged on both the front and back of the petals.  A darker blue ink was sponged in the center, as shown above.  The petals were shaped then the stamens were added in the center.  

The flowers were arranged on the left side of the card.

One of Susan's rubber stamps was used for the sentiment.  Some small blue flowers were created using Susan's Garden Notes Forget-me-not die set.  They were glued around the larger flowers and three added to the sentiment label.

Sunday, April 26, 2020

Pink Tulips


I love pink tulips and decided to create a small bouquet of them using Susan's Garden Notes Tulip die set.  

For the stems for the tulips, two groups of stems weree die cut using the Garden Notes Stems and Bugs die set.  The two stems were glued together and sponged green.  It was attached to the front of the card, just in the thickest part of this stem die cut.  The tulips will be glued under the top edges, so don't glue them down.

The Garden Notes Tulips were die cut using white card stock.  A light pink ink was sponged on the lower portion of the petal and a darker pink sponged on the outside edges of each petal.  They were shaped using the Flower Tool Kit.  The stamens were die cut using black card stock and black pollen added to the tips.  The petal edges were shaped by bending out the edges. The bottom of the tulip was sponged with green ink then attached under the top edge of the stem.  Die cut the leaves and sponge on green ink, shape and attach to the stems.

I created a small pink bow out of twine and added across the stems.  One of Susan's Ladybugs was attached to the sentiment.

For the background and sentiment, I just pulled out some things in my stash I had created much earlier.  


Friday, April 24, 2020

Bouquet of Poppies


First I want to tell you that I am not posting links at the bottom of my blog posts right now.  Most of Susan's older die sets are no longer available.  I have been working with her older sets right now, hopefully giving you inspiration to work with these older sets.   Susan will have a fantastic new release, in August or September, with Spellbinders.  She will have new flower and foliage die sets, a new tool set, and more.  We are anxious for her new release.  I will start linking products as soon as these new products are available.  

I used Susan's Garden Notes Potter Pitcher for the vase.  

The Garden Notes Poppy die set was used for the flowers.  I experimented with these flowers -- I used colored vellum to die cut the flowers.  It is a little harder to shape the petals, but I think they turned out pretty.   It is fun to experiment.

Hope this gives you inspiration to try something different.

Thanks for stopping by today.

Monday, April 20, 2020

Bucket of Forsythia (Tutorial)


While I am waiting for Susan's new release this Fall, I am trying to figure out new ways to work with her older die sets.  

I wanted to create a large bouquet of Forsythia.  I looked through my Garden Notes die sets and thought I would experiment with creating the Forsythia branches using Susan's  Leafy Berry Branch.  

Before I started working on the branches, I die cut a lot of the Garden Notes Forsythia flowers using a bright yellow card stock.  They were all shaped and a dark dot added, with a marker, to the center of each flower.  


When I work with a die set, I like to die cut a lot of the pieces and save extra pieces not used for another time.  These are the Garden Notes Leafy Berry Branch die cuts.


I decided I would probably need three of thee die cut branches to fill Susan's Garden Notes bucket.   The woody stems were colored using a reddish  brown marker.


Next I used a brush and colored the rest of the branch with green ink.  I brushed over the entire die cut on both the front and back.


It is important to shape the leaves, even on a small leaves such as these.  The tip of self closing tweezers was placed on the tip of each leaf, and the sides pinched up to give the leaves dimension.


The branches are now ready for the flowers.  Clusters of the little yellow flowers were glued on all the branches, over where you see the berry impressions.  (The color isn't very good in this photo.)  Forsythia flowers usually are in clusters on the branch.  Susan's Forsythia die set includes a branch and some small leaves, but by using the Leafy Berry Branch, you don't need to glue on the leaves.   Once the flowers are dried on the branches, you can arrange them in the Galvanized bucket.

Attach the bucket to the card front, using dimensional tape in the center (on the back) to give the bucket dimension.  Glue around the sides and bottom.  Once the bucket is attached, using the die cut piece from the top of the bucket to glue down inside the opening, flat to the card front.  The top of the bucket will be standing up a little because you have dimensional tape in the center of the bucket.  This helps leave that edge of the bucket open so you can tuck in the floral branches.  You need that extra piece in the background so it looks like the back of the bucket, and you don't see the color of the card stock behind the bucket.

I add a few pieces of the Garden Notes Ivy in the very front of the arrangement.  The sentiment is one from my stamped stash.  I'm don't remember where it is from.  

It was fun experimenting with different die sets to come up with this arrangement.  

Sunday, April 19, 2020

Bradford Pear Blossoms


Today I wanted to experiment!   I decided to create a card using Susan's Garden Notes Cherry Blossom die set to create Bradford Pear Blossoms.  My tree is starting to develop buds and hopefully will be blooming soon.

The Bradford Pear Blossoms were die cut using white card stock and the base of the petals colored a light green.  The stamens were die cut using yellow card stock and each die cut stamen cut in half to make them thinner.  The stamens were rolled and glued into the center of the Pear Blossom.  In order to get a very little pollen on the end, a fine tip glue bottle was used to lightly touch the end of each stamen.  A spoon was then used to spread the pollen over the glue.  I did not dip the stamen into the pollen, because it would add too much pollen.  

There is a branch in the Garden Notes Cherry Blossom die set, but I had some real branches, and wanted to see how the blossoms would look on them.  I hot glued each blossom to the branches, and really like how it turned out.

I used Susan's bird die and created a robin.  He was attached in the branch using a glue dot.  The sentiment is one of Susan's older sentiment stamps.

Friday, April 17, 2020

Dahlia and Pussy Willow Branches


My friend Christine Smith Pooler created beautiful Pussy Willows for a card she recently posted on Facebook.  She created them using wool roving.  I love her pussy willows but did not have the wool roving.  She was very sweet and sent me some roving so I could try and create the pussy willows the same way she did.  Thank you Christine.  I had fun playing with the roving -  I do think I need more practice.   Christine has a tutorial on her blog - Christine's Creative Nook, (christinepooler.com) that I followed.  I did end up creating mine a little different, but the technique was the same.

Also, another source to learn how to make pussy willows is to watch Susan's  Garden Club Facebook Live Video (Easy Brayer Background Technique, Peonies, Dahlia, and Pussy Willows).  She shows step by step  how to create pussy willows plus shows how to create different flowers.

For this card I used a piece of design paper and die cut an oval on the upper left side, using Susan's Oval dies.  A piece of woodgrain design paper was glued behind the opening.  In the upper right corner I gold embossed the sentiment - the stamp reads 'In all things of nature there is something of the marvelous.'  This is one of Susan's older sentiment stamps.

The pussy willows were created and then glued to some tall branches (an old die was used for this).  This arrangement was tucked down into the bottom of the die cut oval.  Susan's Garden Notes Dahlia 2 die set was used to create the dahlia.  Ladder Fern was die cut, colored and shaped for the background.  

It is always fun to try something new.  I plan to create more pussy willows using the wool roving.

Thursday, April 16, 2020

Clematis


The weather is starting to get a little warmer.  It is in the low 50 degrees today.  I went out to see if my clematis was starting to come up --- it wasn't.  I have a feeling it will be another month before things start growing!   It inspired me to come in and make a card with these pretty flowers.  I will continue to work with Susan's older Garden Notes flower dies until her new release comes out in September.  She announced today on her Facebook Garden Club Live Video that she will be working with Spellbinders for her new release.  We are all very excited about that news.  


I have had a few people ask how I color my flowers with PanPastels.  I thought I would show a picture of the petals I am working on.

First die cut the Garden Notes Clematis petals.  I like to use PanPastels when I want to do blending. The Clematis I wanted to create are pink with a bright pink coloration down the center of each petal.  The petals were sponged with a light pink PanPastel.  Then using a PanPastel sponge,  bright pink PanPastel was rubbed down the middle of each petal.  Rub the powder in good.  Since PanPastels are a fine powder, I like to use a Swiffer cloth to brush off the excess powder.  This keeps my work area clean.  After adding the bright pink PanPastel, I used a white eraser to erase any that has gotten too close to the edge of the petal.  I love using PanPastels because  they blend so well together.  

I hope this helps you when you color with PanPastels.  

Tuesday, April 14, 2020

Daisies and Forget-me-nots


My friend Christine posted an inspiration picture that I love and wanted to recreate.  It is similar.


Here is the floral arrangement picture that Christine posted.

I used Susan's Garden Notes Shasta Daisies and Forget-me-not die sets.  The flowers are in Susan's Garden Notes Gathering Basket.

It was fun trying to recreate these flowers.

Monday, April 13, 2020

Bells of Ireland


Good Morning.  I created this card after watching Susan's  Garden Club FaceBook Live video on how to create the Bells of Ireland using some dies from her Garden Notes die sets.  Here is the link to her video so you can create these beautiful flowers.

In Susan's  Galvanized bucket I have created the Bells of Ireland, lilacs, an orange Spider Mum, a couple Pansies, and Ferns.

The black die cut is the Spellbinders Destination Japan - Zen Garden.  


Sunday, April 12, 2020

Happy Easter


I want to wish all of you a Happy Easter. 

This card was created using Susan's Garden Notes Lily, Primrose, Forsythia, Ivy and Urn die sets.  

Hello


I hope all of you are doing OK.  It has been pretty boring not being able to leave the house,but we are staying well.  We have been staying home now for at least four weeks.  Our daughter has been doing grocery shopping for us, if we need any thing.  It looks like most people are staying home and hopefully this virus will soon stop spreading.   Having to stay indoors has kept me busy doing Spring cleaning and learning to create a lot of new recipes for meals and baked goods.  Luckily, we haven't gained any weight!!!   It is Easter Sunday and we miss being with our family.  The weather has been kind of crazy - for a while we would wake up to snow every morning but luckily it would usually melt by noon.  We would then have some beautiful weather then back to cooler weather with high winds and rain.  The lawn is starting to turn green but there are no flowers blooming yet.    I decided today I should work on creating my own paper garden! 

I created a floral arrangement of Lilacs, Pansies, and Ferns.  They were all created using Susan's Garden Notes die sets.  The vase is a die cut 'cast off' from a die cut I used for another card.  It reminded me of a vase.  To dress it up, I used a sticker border I had in my stash.  The arrangement was attached to an embossed piece of white card stock. The sentiment is a sticker from my stash.