Pages

Monday, April 27, 2015

More New CountryScapes dies

 Today I designed a Get Well card using some of Susan's new CountryScapes dies that are coming soon at Elizabeth Craft Designs.  This is a 4 1/2" x 6" card.  The dies used for the vase of flowers are in the CountryScapes - Backyard 2 die set.  The tall greenery behind the flowers is a die cut from the CountryScapes - Woods 2 set.  The white background was embossed with the Elizabeth Craft Designs Damask embossing folder. I distressed the edges of this piece. The tag used in the center, is from the ECD Tags & More 5 - Sunburst die set.  The row of dots under the tag were die cut with one of the dies from the same tag set.  The scallop oval was die cut using one of the dies from the Accordion Oval Card set.  The pretty butterflies are from Susan's Garden Notes - Bugs & Butterflies.  For the sentiment I used stickers from ECD

Below I will show you how I created the vase of flowers.

 In this picture you can see the little flowers I shaped from the CountryScapes - Backyard 2 set.  In this set you also get the vase and the leaves you use to place the flowers on -- this is the large green piece on the black molding pad in the upper right corner.  I have shaped that piece to give dimension to the flowers.  I wanted to add more greenery behind the flowers, so I die cut the leaves shown, which are from the Garden Patch - 7/8-inch & Mini Leaves die set.  These little leaves look just like the ones on the larger leaf piece.  To make them realistic, I shaped each leaf with the smallest ball stylus from Susan's Tool Set.  Just press down lightly on the front side of each little leaf (on the molding pad), then turn it over and press on the stem to give it shape. 

 I started assembling the vase of flower by gluing the tall greenery behind the vase.  (The vase is from the CountryScapes - Backyard 2 die set.)  Next I attached the greenery from the same set at the top of the vase using a dimensional glue dot. 

The small leaves where glued down on the large green leaf die cut, overlapping them to create fullness.  


The tiny shaped flowers were attached over the leaves.  It is easiest to use the self-closing tweezers from Susan's Tool Set to pick up the little flowers, dip the back in glue and place them over the leaves.  Add as many flowers as you like over the leaves.

Below is a list of supplies used from Elizabeth Craft Designs:


Sunday, April 26, 2015

Susan's Country Scapes


 How fun it is to create a country scene using Susan Tierney-Cockburn's new CountryScapes dies.  Today I am giving you a preview of some of Susan's new dies that will be coming out the end of April, along with a few of the dies and stamp from her products now available from Elizabeth Craft Designs.  This is a 6"x6" card.  I started by creating the beautiful Hollyhocks.  I envisioned them growing by a fence and from there used a variety of Susan's dies to create this pretty scene.  The sentiment is Susan's "Sunshine and Love"  stamp.  I used the Elizabeth Craft Designs Tags and More 1 - Lace to create a small tag to fit the sentiment. I used the top of the die to cut both the top and bottom.   The corners I used are die cut from the ECD "Tags & more 7 - Vine" die set.

These are the Hollyhocks I created with the CountryScapes Mini Botanicals - Hollyhock dies.  I chose to use the flowers on the left in this picture, for this card. These pretty flowers are really easy to create and I think look so realistic.  The height of these flowers is approximately 3 3/4".  They are just perfect for any of your greeting cards. 


Starting on the left, I die cut the birdhouse twice from the CountryScapes - Wood 2 die set.   It was colored by sponging on the color.  The second birdhouse was used to make it dimensional -- I cut the "roof" off the house and shaped it using the largest stylus in Susan's Tool Set, then attached it with a rolled up glue dot.  This gave perfect dimension to the birdhouse.  

The fence was die cut from the CountryScapes - Country Fence 1 die.  It was sponged with several colors of ink, again for dimension.  The tree stump and the tall grass on the left were die cut from the "CountryScapes - Woods 2" die set; I cut down each blade to make them thinner to resemble grass.  I used the tallest grass die again for the stems for the small purple flowers.  The tiny flower die is in the CountryScapes - Backyard 2 die set; it was used for the purple flowers that were glued to the tall stems; two stems were covered with flowers and glued close to each other.  

The Rooster, Chickens, and Squirrel,  are from the CountryScapes - Country Critters 1 die set, AND did you see the cute Ladybug?  It is also from the Country Critters 1 die set.    The Wagon Wheel and the grass, on the right side of the card, were die cut from the CountryScapes - Backyard 1 die set.  Last, but not least, the little yellow butterflies were die cut from the Garden Notes - Bugs & Butterflies die set. 

Many of the dies I used for this Country Scene will be coming out soon (the end of this month) at Elizabeth Craft Designs.  I will mark them "New" in the supply list below.  I know I have used a lot of dies from different sets to create this card, but I wanted to show you the variety of dies to give you inspiration to create your Country Scenes. 

1015 - CountryScapes Mini Botanicals - Hollyhock (New)
1011 - Garden Notes - Bugs & Butterflies (New)
1010 - CountryScapes - Backyard 2 (New)
1014 - CountryScapes - Woods 2 (New)


Monday, April 20, 2015

Dogwood Shadow Box


Today is my turn to design a project for Susan's Design Team on the Elizabeth Craft Designs Blog.  I created a dogwood flower shadow box with Susan's Garden - Dogwood dies. Dogwood flowers are either white or pink. I love the delicate pink flowers so that is what I have created for this shadow box.

ECD-STCDT-April2015-B
 The finished shadow box is 6"x 6". With the pretty lacy top, the height is 7-1/2". On the side, I created an accordion fold so it will push down flat. The instructions are below.

ECD-SGDT-April-2013-tut1
1. Creating the flowers: Die cut all the petals using white cardstock. Use the Leaf Tool from Susan's Garden All Metal Flower Tool Set to draw vertical lines on each petal, as shown in the picture below. Then use the medium-sized ball stylus to shape each petal on the backside.

dogwood-picture
2.  To create the color of my flowers, I used the picture above to try and duplicate the delicate pink on the petals.

ECD-SGDT-April-2013-dogwood
3.  Above is a picture of the dogwoods I created.

ECD-SGDT-April-2013-Tut2
4. To achieve this coloring, use Rouge Pan Pastel (light pink) across most of the petal leaving the top and base of the petal white. Next, rub in Magenta Pan Pastel in the center, blending it well over the light pink Pan Pastel.  As a rule, I generally color my petals before shaping, but for this flower, I found it was easier to get the color in the middle by bending the shaped petal over my finger and applied the Pan Pastel with Fantastix Coloring Tool Brush Point.

ECD-SGDT-April-2013-Tut3
5. Next the four shaped petals were glued to the calyx (base) die cut piece. Once the petals have dried on the calyx, you can use the tweezers to add additional shaping.

ECD-SGDT-April-2013-Tut8
6. To create the stamen, use the Fine Pointed Scissors to cut between each stamen projection to make them thin.  The stamen was then rolled and glued closed and placed in the center of the flower using the self-closing tweezers in Susan's Tool Set. Once the stamen was firmly attached in the center of the flower, add Viva Light Moss Green Paper Pen to the tips of each stamen. Put a very tiny dot on both the front and back of each projection.

ECD-STCDT-April2015-Tut-1
7. I wanted to create a shadow box that would fold down flat. Start with a piece of 18" x 12" cardstock and cut it down to 18" x 6".  To create accordion sides, score it at 4-1/2",  5",  5-1/2", 11-1/2", 12" and 12-1/2".

ECD-STCDT-April2015-Tut-2
8. The picture above shows how the accordion sides are folded. To create the accordion folds, with top side up, create a valley fold on the center score line and a mountain fold on the two outside lines. Do the same thing on the other score lines. Crease the folds well with a brayer or Bone Folder tool.

ECD-SGDT-April-2013-Tut4
9.  Use Susan's Garden Patch - 1 1/2-inch grid die for the window.

ECD-SGDT-April-2013-Tut5 
 10. The die was taped to the front of the card in between the score lines and die cut. This will fit because the card is 6" tall.
 
ECD-SGDT-April-2013-Tut6
11. The grid die cut a perfect opening for the Shadow Box. I did not use the little squares, but did use the die cut frame for the inside of the box.

ECD-STCDT-April2015-Tut-3
12.  Before attaching the Shimmer Sheet to the inside of the card, the panels on the back of the shadow box were taped down with transparent Double Sided Tape, to create the box.  To get the back panel folded exactly right, a piece of 6x6 inch card stock was placed in the back scored lines then the back panels were taped down.  When you place the colored 6"x6" card stock in the back, you will get a perfectly square box.


ECD-STCDT-April2015-Tut4
13.  This photo shows how the back pieces overlap.  A 6x6 inch piece of card stock is glued to the back of the card to finish the backside.

ECD-SGDT-April-2013-Tut7
14.  For a pretty background for the dogwoods, I used a piece of the ECD Pink Iridescent Shimmer Sheet and embossed it using the ECD Heart Strings Embossing Folder.  The white die cut Grid was glued over the Shimmer Sheet (it is not glued together in this picture).    Next, the shadow box was pressed down in a flat position, and the grid was glued in so it perfectly fit inside the die cut opening.

 ECD-STCDT-April2015

15.  To complete the shadow box, I used Purple/Silver Glitter border stickers on each side of the opening then attached additional dogwoods.  Across the top of the box I added two Paris Edges die cuts.  One was glued to the inside of the front and the other cut shorter and glued to the top side of the frame.  A piece of glitter paper from the edge of the glitter border was used at the top of the opening and along the bottom, I used some of the "scraps" from both the Paris Edge die cut and the from the border sticker sheet.

Shadow Box Cards are very easy to create.  I hope you enjoyed this project.

Products from Elizabeth Craft Designs:
1009 - Susan's Garden Dogwood
808 - Susan's Garden Tool Set
809 - Susan's Mini Molding Pad
802 -Fine point scissors
Susan's Garden Patch - 1 1/2-inch grid & Mini Petals die

E112 -Heart Strings Embossing Folder
SS0104 -Pink Iridescent Shimmer Sheet
506 -Transparent Double Sided Tape
7045 - Purple/Silver Glitter Ribbon Branches border stickers
979 - Paris Edges

Other Products used:
17"x 6" card stock for Shadow Box
Score Board
White Card Stock
340.88 Rouge, Pan Pastel (light pink)
430.5 Magenta Pan Pastel
"Fantastic" Coloring Tool Brush Point
Viva, Light Moss Green, Paper Pen
Glue
Bone Folder Tool


Sunday, April 19, 2015

Springtime in Paris


Today I am showing you a home decor piece I designed.  I started with a 12 x 12 inch framed canvas and covered it with design paper on both the top and the sides.  I had two pieces of the design paper so I used the second one to cut out some of the flowers in the design and popped them up with dimensional tape.  Next I attached a three dimensional Eiffel Tower embellishment on the right side.  

My next step was to create flowers that matched those in the design paper.  I used Susan's Garden flower dies to do that.  I created two different types of lilies, roses and lilacs.  Also along the "Paris" embellishment I created an ivy vine with Susan's dies.    There are a few extra little embellishments added to complete this piece. 

There is always something beautiful I can create with Susan's Garden dies!


Friday, April 17, 2015

New Flower dies by Susan


Have you been enjoying creating the new smaller flowers by Susan Tierney-Cockburn?  These flowers are just the perfect size to use on cards or smaller projects.  Today I am giving you a preview of the flowers that will be coming out soon at Elizabeth Craft Designs for Susan's Garden Notes and Susan's Garden flower dies. I had so much fun creating these beautiful flowers.  Susan will have a total of 13 new die sets in her release coming out soon.  There are additional flowers and leaves that will be in the new Country Scapes die sets which I will post later. 

Be sure to watch for this release at Elizabeth Craft Designs.  If you haven't already done so, you can subscribe for the Elizabeth Craft Designs Blog updates at this LINK.  Also, there are daily posts on FACEBOOK to give you a lot of inspiration.
 

Tuesday, April 14, 2015

Yellow Rose Pivot Card

Today I have worked with the  Elizabeth Craft Designs Butterfly Pivot Card dies to create this 6" x 6" card. The Pivot Butterfly was die cut on the upper portion of the card so I could add a pretty Susan's Garden Rose.  I used a double sided card stock; teal on the outside and on the inside it is Kraft.  This allowed the butterfly to be a different color when the card is closed and the butterfly pivots out. 

 I used the Susan's Garden Rose 1 die to create this rose and the rose buds.    The petals were die cut using light yellow card stock then shaded with Yellow Pan Pastels.  I decided to add a little glitz to the rose petals, so added  ECD Silk Microfine Glitter.  I love how it highlighted the edges of the petals.  To add the glitter, I lightly brushed  Aileen's Tack-It Over & Over to the edges of the petals and let it dry.  I then sprinkled on the Diamond Microfine Glitter and rubbed it in to give it a high shine.  

This is the inside of the Butterfly Pivot Card.  I used three different sets of Elizabeth Craft Design Peel Off Stickers on this card, which are listed below.  

The Products used from Elizabeth Craft Designs are:

327 - With Love Stickers


Monday, April 13, 2015

Cute Daffodils


I finally have daffodils blooming in my yard.  I love creating these mini daffodils using Susan's Garden Patch Mini Daffodil dies.  I selected the cute Elizabeth Craft Designs Flower Cuties Peel Off Sticker to coordinate with the mini daffodils.  ECD Silk Microfine Diamond Glitter was used over Transparent Double Sided Tape and colored and the image colored with Copic Markers.  The image was backed with a piece of black card stock. 

 These little daffodils look like they might be hard to create but are very easy.  You glue the five bottom petals to the calyx (base) piece then roll the center and glue the edge to create the up right part; glue this piece in the center of the petals.  The stamen is then glued down in the flower.  I added Susan's Yellow Pollen to the ends of the stamens before gluing them in the flower.  One of the things that I think makes the daffodils look very real, is to use the self-closing tweezers and roll the top edge of the flower out to resemble a real daffodil; I think you can see the rolled edges in this photo.  The flowers were shaped using Susan's Flower Tool Set

The following products can be purchased from Elizabeth Craft Designs:


Sunday, April 12, 2015

Beautiful Roses


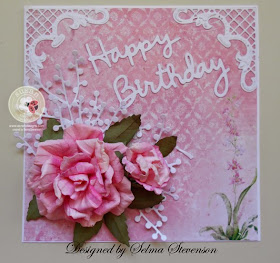
Roses, I think, are loved by everyone!   In the crafting world, they are so beautiful on any card or project and make you feel good.  Susan Tierney-Cockburn has dies to create many different sizes of roses and they always look so real when created.  Today I have used Susan's Garden Rose 1 dies, which create the largest rose in her collection, to design this card.  For the background, I used a sheet of design paper from a Janneke Brinkman-Salentijn Paper Pad that was sent to me by a very dear friend in Holland.  I knew when I saw this piece of design paper that I wanted to create a pretty rose for it.  Behind the rose I added a Berry Branch from ECD.  The Sentiment is die out of the Happy Birthday PopUp die set from Elizabeth Craft Designs.  You not only get the PopUp die to create a fun card; you also get the dies for this beautiful sentiment.

 The rose and rose bud petals were die cut using light pink card stock.  I used both the light and dark pink Pan Pastels from Susan's Pan Pastels set to give the rose shading.  I was able to shape the petals to look very realistic using Susan's Tool Set.  The leaves were die cut using green card stock, then shaped with the leaf tool and lightly sponged with a little brown ink just for a little shading around the edges and down the center. 

 Here is another view.

These roses are very easy to create and will always be beautiful if you take the time to shape them with Susan's flower tools to make them look realistic.  If you have any questions about creating a rose, just let me know.

The products from Elizabeth Craft Designs are:


Monday, April 6, 2015

Susan's Garden Coreopsis

 Don't these flowers look like they were just picked out of the flower garden!  I love how  Susan's Garden flower dies help us create  such realistic flowers.  I used her Coreopsis  dies from Elizabeth Craft Designs to decorate the lid of a 4" square box.  I plan to put a sentiment down in the lower right corner when I am ready to use it.


The flower petals were die cut using yellow card stock.  A red marker was used to color the base of each petal.  The stamen was cut using both yellow and red card stock.  Two red stamens were rolled together (one on top of the other) then one yellow stamen was rolled on the outside of the red ones.  I cut down the center of each stamen with scissors to make them frilly, before assembly.  I used Susan's Yellow Pollen on the tips of all the yellow stamens and just a little on the tips of the red.


Here is a picture of the entire box.  I decorated the bottom of the box with stickers from Elizabeth Craft Designs.


Sunday, April 5, 2015

Happy Easter


Today I created a card to wish you a Happy Easter.  I used Susan's Garden Notes Lily die set for the pretty flowers.  I used white card stock for the petals and lightly sponged on Spun Sugar Distress Ink on the lower portion of each petal, then used Susan's Light Green Pan Pastel at the base to give it a slight green tint.  A pink marker was used to draw lines up the petals and to add dots.  The petals were shaped with Susan's Flower Tool Set

 The stamens and leaves were die cut using a very pale green card stock.  Susan's brown pollen was added to the tips of the stamens.  

The background for this 6x6 card was embossed with the ECD Sea Glass embossing folder.  Behind the flowers I used two die cut Paris Edges, placed back to back, to form a doily.  In the corner I used ECD White Velvet corners.  The tag was die cut using the scalloped die from the ECD Accordion Oval Card die set.  

Happy Easter to all of you.

The following products can be purchased from Elizabeth Craft Designs:

7003 White Velvet Corners